Office 365

Microsoft Teams The Hub for Modern Collaboration

We are getting deep and will wrap up the Modern Collaboration blog series by tying all of the products we have discussed together using Microsoft Teams as our hub! Before we do that, I’d recommend checking out the previous posts from this blog series below.

  1. What is Modern Collaboration, and how does it impact business?
  2. Modern Collaboration with Microsoft OneDrive, SharePoint, and Teams!
  3. Accessing and Saving Files in OneDrive for Business and SharePoint
  4. Sharing Files in OneDrive for Business and SharePoint
  5. Restore Previous Versions and Deleted Files from OneDrive for Business and SharePoint

Now let’s dive into Microsoft Teams as a hub for collaboration!

What is Microsoft Teams

In our first blog post, I introduced Microsoft Teams as a basic chat application that integrates with other web applications. This description is an oversimplification. Ultimately it is designed to be your one-pane-of-glass into everything productivity. It does a surprisingly good job of this and is getting better every day with new third-party integrations in my experience. 

Bringing Modern Collaboration Together with Teams

Throughout this blog series, we have focused on files in OneDrive for Business and SharePoint. The reason being is collaboration can mean countless things depending on what your job functions all. However, the most common collaboration is working on Office Documents with people on your team and inside your organization. 

Using Microsoft Teams brings together many pieces of the Office 365 suite, including a Shared Mailbox, a Distribution List, a Shared Calendar, a Shared OneNote Notebook, and shared Files, all together in a single entity, where you can manage the permissions. Additionally, you can use the Microsoft Teams Application to chat and collaborate with your Team in a single pane of glass.

With a couple of clicks, you can upload a Word, Excel, or PowerPoint document into a team’s channel, and solicit feedback and collaboration from your team. In real-time, spread across the entire world, from almost any device, your team can open that document, make changes, and see the changes the other team members are making.

Organizing Teams

Microsoft Teams helps organize your collaboration into what else, Teams! Trying to understand the difference between Microsoft Teams and a Team inside Microsoft Teams can confuse people when describing where to find something. I always try to be clear when discussing the application and say Microsoft Teams. When talking about the different collaboration groups inside of Microsoft Teams, it is when I say, Teams.

How you organize your Teams inside Microsoft Teams is most comfortable to understand when talking about raw permissions. If I add someone to my Team, everyone in my Team can see all the files, conversations, and apps added to the Team. They may be broken up by location, department, project, or any group you need to collaborate with and keep the data secured within that group.

You can take your organization of the Team even further by creating Channels. Channels are like folders when you think about organizing your files; however, inside of Microsoft Teams is breaks not just your files up, it also helps you organize conversations, apps, and overall how you want to collaborate. Inside of your Team, you can structure your channels; however, you and your Team believe is best.

By default, every Team has a General channel. I always recommend starting there and identifying additional channel needs. Maybe your department has a Team, and you have a small internal project that you want to keep organized within its own channel. Suppose this project will involve people from outside your department. You may want to consider creating a Team just for it.

Creating a Team

Creating a Team is easy! Assuming your organization has not blocked this functionality, you can open Microsoft Teams, click Teams, and at the bottom will be a button to “Join or create a team.”

There are many more things we could dive into in specific use-cases on how to collaborate in Microsoft Teams, and I’d love to engage with you to find out the best way for you to get the job done; please reach out! This will be the conclusion of our Modern Collaboration blog series, and I hope you learned a few things and have some general ideas into the possibilities it unlocks.
Restore Previous Versions and Deleted Files from OneDrive for Business and SharePoint

We are getting deep into the Modern Collaboration blog series. If you haven’t read the previous articles, I’d strongly recommend starting from the beginning.

  1. What is Modern Collaboration, and how does it impact business?
  2. Modern Collaboration with Microsoft OneDrive, SharePoint, and Teams!
  3. Modern Collaboration: Accessing and Saving Files in OneDrive for Business and SharePoint
  4. Modern Collaboration: Sharing Files in OneDrive for Business and SharePoint

As you can see, we are diving into the how-to part of this blog series, and we will continue diving into OneDrive and SharePoint, focusing on restoring previous and deleted versions of files.

Reverting to old versions of the file

Reverting files can be useful when you work on a file and decide you want to see an older copy. It becomes critical when you are collaborating with a group of people on the same document. Co-authoring is incredibly useful, especially when trying to accomplish work from anywhere on any device. You may not always be in the same physical office as your co-collaborators, and co-authoring office documents gives you the ability to accomplish the same task.

However, co-authoring also introduces additional complications, and you may want to see or restore a previous version of the document. Restoring old versions is entirely possible and easy to do!

Through Office Apps

  1. Click File
  2. Click Info
  3. Click Version History
  4. Choose the version you want. You can choose to Compare or Restore the file after opening it.

On the Web

  1. Open your favorite web browser and navigate to https://www.office.com 
  2. Click Sign in
  3. Log in using your Work account
  4. Click OneDrive or SharePoint, depending on where the file is saved.
  5. Navigate to the file you want to restore
  6. Select the file you want to see previous versions for
  7. Click the three dots … icon in the top bar
  8. Click Version history
  9. Select the file version to open it

Using the Sync Client

  1. Navigate to the file you want to restore
  2. Right-click the file you want to see previous versions for
  3. Click Version history
  4. Choose to Download to see a copy of the file, or Restore to restore the file.

Recovering deleted files

There are times that you might have deleted a file, or another person with access to the file deleted a file. It doesn’t matter if it is intentional or not; restoring deleted files is possible! To recover deleted files, you will have to use the website to access the recycling bin.

Recovering OneDrive for Business Files

  1. Open your favorite web browser and navigate to https://www.office.com 
  2. Click Sign in
  3. Log in using your Work account
  4. Click OneDrive
  5. On the left menu, click Recycle bin.
  6. Select one, or more documents you wish to recover 
  7. Click Restore in the top menu

Recovering SharePoint Files

  1. Open your favorite web browser and navigate to https://www.office.com 
  2. Click Sign in
  3. Log in using your Work account
  4. Click SharePoint
  5. Click the SharePoint Site where the file is saved.
  6. On the left menu, click Recycle Bin.
  7. Select one, or more documents you wish to recover 
  8. Click Restore in the top menu

Using OneDrive for Business and SharePoint to save your files gives you many capabilities on how accessible your information is; even old copies of your files are significantly easier to get to without creating multiple copies of the document! I hope you keep reading my blog series on Modern Collaboration and look forward to my next one! I’ll give you a hint. We are going to start exploring Microsoft Teams!

Modern Collaboration: Sharing Files in OneDrive for Business and SharePoint

I hope you are enjoying the Modern Collaboration blog series. If you haven’t read the previous articles in the series, I highly recommend you do. We started this series by broadly talking about what Modern Collaboration is and how it impacts business. The second post was a brief introduction to some of the Microsoft Office 365 products, such as OneDrive, SharePoint, and Microsoft Teams. Now we are diving deep into the different individual products and how-to-use them. The first deep-dive was on Accessing and Saving files in OneDrive for Business and SharePoint. Now we will talk about how you can share your files from OneDrive for Business and SharePoint!

Sharing Options

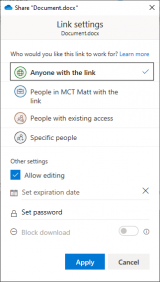
Before we dive exactly into the how-to share them, I’d like to review all of the sharing options that are available to you. When sharing a file, the permission in which you share is crucial so that you can understand who can use the link, how long it will work, and if they can cause more damage than you intended to your files.

The following sharing options we will review give you the ability to ‘allow editing.’ The allow editing checkbox is critical to verify every time you create a sharing link. In most instances, you may only want people to look at a file and provide feedback to you. In this case, you should uncheck the ‘allow editing’ checkbox; if you leave it checked, they can change the file contents.

Anyone with the link

Using the ‘Anyone with the link’ option is an easy one to select. You know if the email is forwarded, the link will work for anyone that receives it. Having the link work for anyone might sound appealing initially; however, you must consider that the link will work for ANYONE. Keep in mind; this means if the email is forwarded to someone nefarious, that person can delete content, move it around and mess the file up. Now, in the next blog post in the series, you will see how to restore previous versions and deleted files; but this may be unnecessary if you set your sharing permissions correctly initially.

When using ‘Anyone with the link,’ you receive additional options that you won’t get with other links. For example, you can set an expiration date for the link. Setting an expiration is something I highly recommend you do if you have to use this type of link. 

Additionally, you can set a shared password that someone must enter before they can access the link. Using a shared password is slightly more secure than just a link that works; however, the password is typically in the same message as the link, which means if it is forwarded to someone nefarious, that person can still do significant harm.

People in (Organization Name) with the link

I like this option quite a bit. It means the link will work for anyone else who works at your organization. It will require them to log in to their work or school account, and it will tie their name to any changes made to the file.

Keep in mind, though, if the file’s content is sensitive, this does risk exposure to other people within the organization seeing it.

People with existing access

The ‘People with existing access’ sharing link is unique. You may or may not use it frequently. I find myself only using it when I have someone on my team asking for a file that they could get to themselves, but maybe in the middle of a meeting and need it now, or when I am preparing an agenda for a meeting, and I want a quick link to the file. You will notice, this sharing option does not have the ‘Allow editing’ checkbox. The reason is that it isn’t granting new permissions, only giving you a quick link to access the file, and it uses their existing permissions to the file.

Specific people

The specific people sharing link is by-far the most secure way to share files, especially if you grant editing access to sensitive content. The only way the link will work for people is to specify their name or email in the sharing dialog. If you only type one person, then copy the link to Outlook. Anyone you send it to; except, the person you entered into the sharing dialog, can not open the link.

Sharing files

Now that you know the different sharing options that are available to you. We can now dive into sharing the files with other people inside and outside of your organization.

The fantastic part about sharing files in both OneDrive for Business and SharePoint is that the sharing dialog is the same for OneDrive for Business and SharePoint and across all of the different ways of accessing it.

Through Microsoft Office apps

To access the sharing dialog while using the Office Apps, you will need the document open and follow the below steps

  1. Open the file you wish to share
  2. In the top right of the Office App, click Share
  3. Verify which sharing option you want to use, staying mindful that it is best to be the most restrictive with your permissions to keep your data safe.
  4. Type the email addresses you wish to share with
  5. Optionally type a message to include with the file
  6. Click Send

Through the OneDrive for Business or SharePoint websites

To access the sharing dialog while using the web, you must first navigate where you wish to share the file or folder and follow the below steps.

  1. Select the file or folder you wish to share
  2. Click Share on the top bar
  3. Verify which sharing option you want to use
  4. Type the email addresses you want to share with
  5. Optionally type a message to include with the file
  6. Click Send

By using the Sync Client on Windows 10

To access the sharing dialog while using the OneDrive Sync client, you must first navigate where you wish to share the file or folder and follow the below steps.

  1. Right-click the file or folder you wish to share
  2. Click Share on the menu that shows up
  3. Verify which sharing option you want to use
  4. Type the email addresses you want to share with
  5. Optionally type a message to include with the file
  6. Click Send

By sharing files through OneDrive for Business and SharePoint, you unlock many rich features that we will dive into in future blog posts. You will see automatic versioning and co-authoring highlighted, which will open a whole new world of possibilities for collaboration and access to information. Keep an eye out for the next post in the Modern Collaboration blog series on Restoring Files in OneDrive for Business and SharePoint.

Modern Collaboration: Accessing and Saving Files in OneDrive for Business and SharePoint

The time has come in my Modern Collaboration blog series to start diving deep into the how-to. We started this series by broadly talking about what Modern Collaboration is and how it impacts business. The second post was a brief introduction to some of the Microsoft Office 365 products, such as OneDrive, SharePoint, and Microsoft Teams. Now is the time we start to dive deep into the different individual products and how-to-use them. This blog will dive into OneDrive for Business and SharePoint file storage, specifically finding and saving files.

Microsoft Office with OneDrive for Business and SharePoint

When working with cloud storage and Microsoft Products, everything is built right into the Office Suite! From the File menu, which is the screen you start on when launching the applications, you will automatically see recent files you have used in SharePoint and OneDrive for Business, as long as your accounts are connected. You even have the option to Pin files or see files that have been shared with you and who shared them.

If the file isn’t something you have worked on recently, that is no problem! You can click on Open on the left menu and navigate through all of your connected accounts SharePoint sites and OneDrive for Business sites. 

If your files are not showing up, you will need to connect your account. To add accounts to your Office applications, follow the below steps.

  1. Open an Office Application such as Word, Excel, PowerPoint.
  2. Click Account on the bottom left of the application
  3. Click Add a service 
  4. Hover over Storage and click OneDrive for Business
  5. Log in using your Work account

If you just created a new document and need to save it, the interface is identical, and it will show all of your connected accounts OneDrive for Business and SharePoint sites. The unified experience inside the office applications gives you the full capability of quickly securing your files to be available anytime, anywhere on any device.

Accessing and Uploading to the Web

You won’t exclusively work with office documents, so using the office applications to open and save files will not be your only means of accessing OneDrive for Business and SharePoint. With OneDrive for Business and SharePoint storage, it is all web-based and accessible through a website.

To upload your file, you need to think about who needs access to the file. Depending on your organization, you may have teams based on departments, locations, projects, or just any group you work with frequently across departments. However, let’s start with something easy. You have a brand new document you started working on, and you need to save it, but it isn’t quite ready to share with a team. The answer to where to keep it is straight forward. You can save it in your personal OneDrive for Business storage.

To access your Onedrive for Business storage and upload a document, follow the below steps.

  1. Open your favorite web browser and navigate to https://www.office.com 
  2. Click Sign in
  3. Log in using your Work account
  4. Click OneDrive
  5. Navigate to the folder you want to upload your saved file to
  6. Click Upload at the top navigation bar
  7. Select Files
  8. Select the files you want to upload and click Open

What about finding a file you uploaded a long time ago, or someone else on your team has uploaded? Unlike a mapped network drive or a file on your computer, the brilliant thing is that knowing exactly where the file is, isn’t that big of a deal. If you know precisely which SharePoint site the file was saved in, which Document Library and folder it is in, you are welcome to go straight to the file and open it. However, the search capabilities of OneDrive for Business and SharePoint are incredible; not only will it search the file name, but it will also examine the content of the file.

To use OneDrive for Business and SharePoint’s search functionality, you can use almost any of the search boxes found in the Office 365 portal or connected SharePoint sites. If you are on a work computer running Windows 10, you can even search the start menu files and click see work and web results, assuming enterprise search is enabled.

To search from the Office website, follow the below instructions.

  1. Open your favorite web browser and navigate to https://www.office.com 
  2. Click Sign in
  3. Log in using your Work account
  4. Click the Search box at the top of the screen
  5. Search any keyword related to the file, it could be the name of the file or a topic that the file is about, and you think it is referenced in the file.

Sync OneDrive for Business and SharePoint to Windows 10 computer

The last way I want to talk about accessing and saving files is using the OneDrive sync client. Now, I try to discourage the extensive use of the OneDrive Sync client to a Windows computer. It tends to confuse users, but it does make interacting with non-Office files significantly more accessible, so it becomes a necessary evil.

Using it for personal OneDrive for Business files makes sense. You can automatically sync your Documents, Pictures Videos, and comfortably have those files backed up immediately and available on all devices. However, it gets a bit trickier when you are working with multiple SharePoint Sites.

First, you must locate the SharePoint site that you wish to Sync with your computer. To do this, follow the below instructions for every SharePoint site you want to sync.

  1. Open your favorite web browser and navigate to https://www.office.com 
  2. Click Sign in
  3. Log in using your Work account
  4. Click SharePoint
  5. Click the site you want to sync
  6. Click Documents on the left side
  7. Click Sync on the top menu
  8. Click Open when prompted to open the OneDrive client

By syncing the files to your Windows Computer, you will find them listed in Windows Explorer on the left navigation. You can open the files, create new ones and even share the files straight from Windows Explorer.

As you can see, there are at least three ways to perform tasks when working with OneDrive for Business and SharePoint file storage. Each has specific pros and cons, and it comes down to how you work on what will be best for you. I encourage you to try them out and see what you like best!

Keep an eye out for the next post in the Modern Collaboration blog series on Sharing Files in OneDrive for Business and SharePoint!

Modern Collaboration with Microsoft OneDrive, SharePoint, and Teams!

I’ve recently worked a lot with the Microsoft Cloud, specifically around productivity and Modern Collaboration. I decided to start a series of posts, and this is the second post in the series of at least four blog posts. If you haven’t read the first post in the series, I strongly encourage you to start with “What is Modern Collaboration, and how does it impact business?

The Microsoft Cloud is exceptionally vast in the number of products available. We are going to focus on the Office 365 segment of the Microsoft Cloud. Now, you will see the branding Microsoft 365 occasionally also, Microsoft 365 is a product line that includes Office 365, along with Windows licensing, and other subscription products for security and managing computers and mobile devices. Recently, Microsoft started using the Microsoft 365 branding for some small business and consumer subscription services. This article will not cover any of the consumer subscriptions. However, it is still applicable to the small business plans.

When thinking about Office 365, you need to understand that it is similar to Microsoft Office. When you purchase Microsoft Office, you get multiple pieces of software that install together as a suite of products. Office 365 is very similar. You are buying a subscription, and you get more than one product with that subscription.