Microsoft

Backup Linux using PowerShell

As a follow up to Backups are Important! Here is How I do it! I decided I should let everyone know how I am handling remote backups on my blog. It’s not hard to see that I am obviously a Windows guy, I am also glad to admit that I personally prefer Linux Servers for my blog, it’s a smaller impact, and much much cheaper; although I have considered Azure more than once.

Weapon-overkill

So as I have listed on my last blog post I was bit in the rear on backups and decided to go for overkill. I already have a ton of storage at home so I figured there had to be a way for me to utilize that storage and have a remote backup that isn’t in my Dropbox and isn’t a manual process. So I began researching ways to interface with SFTP, I found out that WinSCP has .NET Assemblys available, and I’ll admit I am far from a programmer and didn’t want to try to hook into that using PowerShell. So I let it sit for a couple of weeks and by god an example of exactly what I wanted to do was posted, and all I had to do was minor tweaks.

How Windows 8 change my view on Microsoft

I have always loved the Windows Operating System, but their phones were a joke back it the day, and their in-house hardware was just accessories and a game console. I have come to the conclusion that Windows 8 isn’t designed to just be an Operating System, it is designed to increase the Microsoft Market Share across all of their devices. I used Windows 8 off and on throughout the previews and it was good but nothing super spectacular. However once it was finally released I decided I was making the leap at home.

Telling Friends/Family/Co-workers about Products

In March 2012 I gave a presentation at work about Windows 8 on Desktop and Tablet and I enjoyed it quite a bit, I had many people asking me questions. After all my research was complete I was starting to tell friends to hold off on buying tablets till the end of the year. Once the Surface came out I made sure I had it on day of release, I took it into the office and I was demonstrating it pretty much all day telling people my impressions on the device and how nice the TouchCover was.

Since then I have had my brother question me about it and I believe the Surface might become his only computer in the near future, honestly it would be my only computer if I were not in the IT Field and some of the Software I use requires the x86 chip architecture. It has even got to the point where my mother is telling her friends about the Surface being such a fantastic device.

Increased Xbox 360 Usage

I think the my Xbox 360 usage has really increased the most. I’ve owned it for many years and I am actually more of a PS3 player than I ever was invested in Xbox. In-fact I own www.playstationeuphoria.com and it started with PSN@Home 5-6 years ago and I was the main one blogging. Once I received my Microsoft Surface I decided to finally try out Xbox SmartGlass and it was amazing, I began buying games for the Xbox and seems like I play it every other day at a minimum.

Purchasing Windows Phone 8

After adjusting to Windows 8, after owning a Surface, and admittedly also playing with the Lumia 900 running Windows Phone 7 at TechEd 2012,  I was impressed. I knew that I was interested in switching from my iPhone since I had owned it for 3 years and no matter how many new devices came out the changes were minimal at best. I decided since Microsoft was knocking everything out of the park I would go ahead and purchase the Lumia 920 once it was available, day it came out I went to the AT&T Store and picked up a Red Lumia 920. I’ve had minimal issues with the phone but overall love it.

Conclusion

Overall I have to say not only did Microsoft do fantastic on Windows 8, and the Surface and on Windows Phone 8 but the integration of all the devices, using SkyDrive has been unbelievable. I’ve got my phone syncing my picture to SkyDrive, and I can pull out my Surface to write a blog and use those exact photos with no effort on my part.

Configure Surface to use MicroSD as Primary Storage

After about a week of excitement and playing around with features, I decided it was time to start optimizing and making this thing run the way I wanted. The first thing I noticed was that I could not use my SD card with my Libraries, so all my apps are going to by default save to the local SSD, which is far from what I want. I knew there had to be a way around this, so I started digging in. I feel I finally have it to the point where others should be doing the same thing, and once done, you can forget about it.

  • Create a VHDX and save it on the SD card
  • Create directories on this VHD for your specific libraries
    • Documents
    • Music
    • Video
    • Pictures
  • Configure the libraries
  • Enable Indexing on the VHDX – This is important because the Photos app doesn’t work right without it.
  • Have a script automatically Attach the VHD on Boot

If you would like to know the exact steps to take, please continue reading.

Creating a VHD

  1. Open Charms Menu (Swipe in from the right side of the screen)
  2. Click Settings
  3. Click Tiles
  4. Change “Show administrative tools” to Yes
  5. Swipe from the bottom of the screen
  6. Click All apps
  7. Under “Administrative Tools” click Computer Management
  8. Click “Disk Management”
  9. Click “Action”
  10. Click “Create VHD”
  11. Browse to the SD Card’s storage and name the VHD whatever you want
  12. Allocate as much of the SD’s storage you want to this VHD,
  13. You can decide between Fixed or Dynamically expanding. I went with Dynamically expanding.
  14. Find the newly created disk in the lower panel, which should be “Disk 2”
  15. Right-click where it says “Disk 2”
  16. Click “Initialize Disk”
  17. Click OK
  18. Right-click “Unallocated”
  19. Click “New Simple Volume…”
  20. Click “Next >”
  21. Click “Next >”
  22. Select the Drive letter you want (can be anything)
  23. Click “Next >”
  24. Name the Volume whatever you want
  25. Click “Next >”
  26. Click “Finish”

Create/Configure Library Directories on VHD

  1. Click the “Libraries” icon from the “Task Bar”
  2. Single click “Documents”
  3. Click “Manage under “Library Tools” from the ribbon
  4. Click “Manage library”
  5. Click “Add”
  6. Browse to the newly Attached VHD you just created
  7. Click “New Folder”
  8. Name it whatever you want (Eg: Documents)
  9. DO NOT OPEN THE FOLDER, select the folder and click “Include folder”
  10. Remove the Default Personal folder
  11. Click OK
  12. Click “Set save location”
  13. Select the newly created folder
  14. Repeat steps 1-13 for the following
    1. Music
    2. Pictures
    3. Videos

Enable Indexing on VHD – Very Important

  1. Open the “Charms Menu”
  2. Click “Search”
  3. Type “Indexing Options”
  4. Click Settings
  5. Open “Indexing Options”
  6. Click “Modify”
  7. Select the newly Attached VHD
  8. Click OK
  9. Click Close

Create Script to Auto Attach on Startup

  1. Open PowerShell as an Administrator
  2. Type “Set-ExecutionPolicy RemoteSigned”
  3. Press Enter
  4. Type “y”
  5. Press Enter
  6. Click Computer from the navigation bar on the left of the Libraries folder
  7. Open the C: Drive
  8. Create a new folder named “PoSH”
  9. Double click the new folder
  10. Right-click in the white area and navigate to “New > Text Document”
  11. Name it Auto-Mount.ps1
  12. Open the new file with Notepad
  13. Paste the below code in, don’t forget to modify the red text to the path you saved the VHDX file at
    1. “Mount-DiskImage D:\YourVHD.vhdx”
  14. Open the “Charms Menu”
  15. Click “Search”
  16. Type “Task Scheduler” and open it
  17. Click “Task Scheduler Library”
  18. Click “Action”
  19. Click “Create Task…”
  20. General Tab
    1. Name: Attach SD VHD
    2. Location: \
    3. Description: This is the Task that automatically attaches the VHD file on the SD card on system boot.
    4. “Click Change User or Group…” type in SYSTEM
    5. Check “Run with highest privileges”
  21. Triggers Tab
    1. Click “New…”
    2. Begin the task: At startup
    3. Click OK
  22. Action Tab
    1. Action: Start a program
    2. Program/script: C:\Windows\System32\WindowsPowerShell\v1.0\powershell.exe
    3. Add arguments: C:\PoSH\Auto-Mount.ps1
    4. Click “OK”
  23. Conditions Tab
    1. Under Power uncheck “Start the task only if the computer is on AC power
    2. Click “OK”
  24. Have fun testing. I recommend opening the Camera app and taking some pictures, making sure it index the new ones, try adding music to the folder make sure it shows up in the music app, the same thing for the Video app.

Update 12-30-2012: Thank you, Don, for reminding me you need to set the execution policy on the machine first.

Is the Microsoft Surface for Me?

In the last 2 days the biggest question I’ve heard is what makes this device good for me? The best response I’ve had for that is if you are a standard user, the Surface can be your only computer and you will not skip a beat with your day to day life.

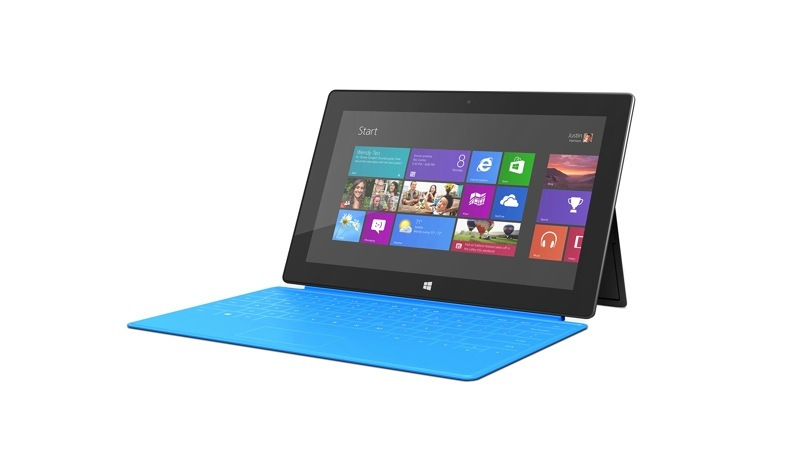
Microsoft Surface with Cyan Touch Cover

First I would like to start out by defining what I consider a “Standard User”. A standard user is someone who uses a computer for email, social media, blogging, consuming media (Music/Video) and casual gaming. This user can potentially be on the go and doing all of these things but this is not a requirement nor does it hurt if they are. …

Setting up a HomeGroup with Windows 8

While recently blogging about using my Surface to share media from my desktop to my Xbox it occurred to me. Some people may not know how to setup a HomeGroup, and it would be very useful to have step by step instructions to ease the adoption of sharing Music and Videos across all of you’re Windows 8 computers in your home.

This is very simple, just follow the steps below.

  1. Open your Charms Menu (bottom right corner using mouse | Swipe in from right side of screen using touch)
  2. Click Settings
  3. Click Change PC Settings
  4. On the left side of this screen scroll to bottom and click HomeGroup
  5. Under Libraries and devices select what you would like to share
  6. Under Membership if you do not already have a HomeGroup create one, if you have one go to the machine that host it and get the Password to join it and enter it there.

Once you have completed that you can access you’re shared content on any computer that is a member by simply opening the File Explorer and under Home Group you will see the users sharing content. You can also add additional files by modifying you’re libraries to include folders in other locations than the default.